Archive | November, 2017

Gluten-Free Chocolate & Vanilla Marbled Loaf Cake

29 Nov

You’ll have to excuse my half-eaten loaf cake pictures! I can never resist long enough to take a photo! Haha This is an adaptation of a Mary Berry recipe, to make it gluten free. It’s lovely, great for travel or lunchboxes and it will keep for several days in an airtight tin. In my opinion however, it was best on the day it was made. Loaf cakes are always drier because they take much longer to cook than other cakes. You can also ice this cake, if you wish, although I think the domed top of a loaf cake makes that rather tricky!

INGREDIENTS
For the cake

  • 225g (8oz) butter, softened
  • 225g (8oz) caster sugar
  • 275g (9¾oz) gluten-free self-raising flour
  • 2 level tsp baking powder
  • 1 level tsp Xanthan Gum
  • 4 large eggs
  • 2 tbsp milk
  • ½ tsp vanilla extract
  • 1½ level tbsp cocoa powder
  • 2 tbsp hot water

METHOD

Preheat the oven to 160°C/325°F/gas mark 3. Lightly grease a 900g (2lb) loaf tin. Line with a wide strip of non-stick baking parchment to go up the wide sides and over the base. You can also get those loaf tin liners which I’m sure make this easier!

Measure the butter, sugar, flour, baking powder, Xanthan Gum, eggs, milk and vanilla extract into a large bowl and beat in an electric mixer for about two minutes, until well blended. As you know, I always use my Kenwood stand mixer. Spoon half into another bowl and set aside.

In a small bowl, mix the cocoa powder and hot water together until smooth. Allow to cool slightly, then add to one of the bowls of cake mixture, mixing well until evenly blended.

Spoon the vanilla and chocolate cake mixtures randomly into the prepared tin until all of the mixture is used up, and gently level the surface.

Bake for one hour at 160 degrees C and then turn up the oven to 180 degrees C and cook for 20-30 mins more, until a skewer inserted comes out clean.

Allow to cool in the tin for a few minutes, then turn out on to a wire rack, peel off the lining paper and leave to cool completely.

Gluten-Free Peanut Butter Dark Chocolate Cupcakes

14 Nov

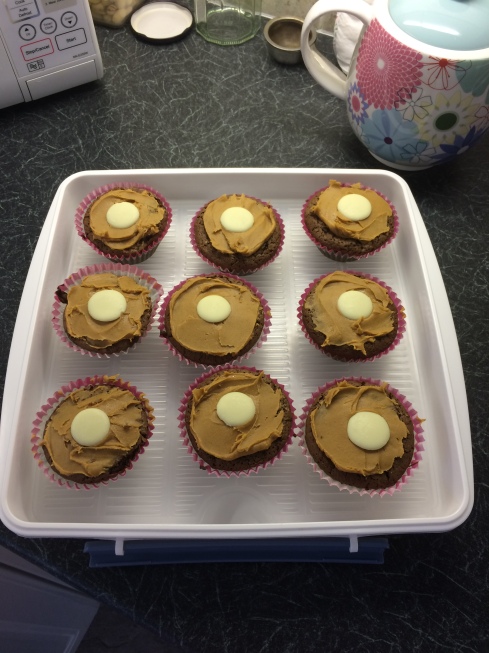
These cupcakes are moist, dark and deeply delicious. If for some reason you don’t like peanut butter, then just don’t spread it on top. I imagine a white chocolate icing, a sprinkling of icing sugar or anything else you care to imagine would pair up well with dark chocolate!

IMG_4375

Ingredients

  • 200g unsalted butter, straight from the fridge is fine
  • 2 tbsp cocoa powder
  • 100ml hot water
  • 200g dark chocolate (I used Sainsbury’s Basics)
  • 300g muscovado sugar, light or dark (I actually ended up using a mix because I didn’t have enough of one type)
  • 4 eggs
  • 175g gluten-free self-raising flour
  • 1 tsp baking powder
  • 1 tsp Xanthan Gum
  • Peanut butter
  • White chocolate buttons

You will also need some paper cupcake cases!

Method

  1. Heat oven to 180C/160C Fan/Gas Mark 4 and lay out your cupcake cases in patty pans. I found this mixture made 15 cupcakes.
  2. Put the cocoa in a small bowl or mug with 100ml hot water. Mix together until smooth, then set aside to cool slightly.
  3. Put the butter and chocolate in a heatproof bowl set over a pan of simmering water and melt gently together, stirring occasionally. Remove from the heat and allow to cool slightly.
  4. In a large bowl, beat the sugar and eggs together using an electric whisk until thick and pale. I use my Kenwood mixer with the whisk attachment. You need to beat it as you would for a swiss roll, until when the whisk is raised, it leaves a trail on the surface for a few seconds. If you have used dark Muscovado sugar then the colour change will not be a guiding factor.
  5. With the mixer still running, pour in the chocolate mixture carefully (use the lowest speed!), mixing until smooth and fully combined.
  6.  Sieve the dry ingredients over the chocolate mixture and fold together until no lumps remain. It’s best to do this with a spatula, work from the edges of the bowl into the centre, using a figure of eight motion. Lifting your spatula will help to keep the air in the mixture.
  7. Add the cocoa mixture and mix to combine. This will loosen the batter slightly.
  8. Divide the batter between your prepared tins. I’m sure there are various potential methods – I made a terrible mess using a spoon and spatula. Sometimes an ice-cream scoop helps, or perhaps you could pour it from a jug?
  9. Bake for 15-20 mins or until a skewer inserted into the middle comes out clean. Allow the cakes to cool in the tins for about 10 mins, then turn out onto a wire rack to cool completely.
  10. Ice with peanut butter straight from the jar and pop a white chocolate button on top for decoration and sweetness!