Archive | Uncategorized RSS feed for this section

Gluten-free Crispie Cakes

10 Sep

I’m sorry for my lack of posts recently; I had a baby and that has been taking up rather a lot of my time. I’m back with a really simple recipe, which is about my level of available time right now! I can’t believe I haven’t shared my Grandma’s recipe with you before – I make it often. This recipe can easily be changed to make gluten-free Rice Krispie cakes, Cornflake cakes or Easter nests.

IMG_4927

Ingredients

  • 6 oz rice crispies or cornflakes
  • 4 oz caster sugar
  • 4 tbsp golden syrup
  • 6 oz plain chocolate (I use Sainsbury’s Basics)
  • 4 oz unsalted butter or margarine

Method

  1. Line a patty tin with paper cases
  2. Melt all the ingredients except the cornflakes or rice crispies in a large saucepan over a low heat, until smooth
  3. Stir in theĀ cornflakes or rice crispies until coated
  4. Put a couple of spoonfuls into each paper case and leave to set

The bigger the better in my humble opinion, so if you have a muffin tin and muffin cases, you could be really naughty and use that. If you want to turn them into Easter Nests, then just add Mini chocolate eggs. I guess you could add any other additional decoration you like! Send me your pictures if you do, so we can all be inspired šŸ™‚ Store in an airtight tin. These are better eaten within about 4 days, but they do keep longer – say up to a week. IF they last that long!!!

Gluten-Free Madeira Loaf Cake

3 Jul

This is a super-easy recipe and it tastes amazing. I urge you to give it a go, it’s hard to go wrong with a loaf cake!

img_4129.jpg

Ingredients

  • 175g/ 6oz Unsalted Butter
  • 175g/ 6oz Caster Sugar
  • 3 large eggs
  • Grated zest of 1 lemon
  • 1/8th tsp Vanilla Extract
  • 50g 2oz Ground Almonds
  • 200g/ 8oz Gluten-Free Self Raising Flour
  • 1 tsp Xanthan Gum
  • 3 tbsp milk

Method

  1. Grease and line a 2lb loaf tin and pre-heat your oven to 150 degrees Celsius/ Gas Mark 3.
  2. Cream your butter and sugar in a stand mixer, or with a hand mixer, until pale and fluffy.
  3. Beat in the eggs, one at a time – it may curdle a little but don’t worry.
  4. Add the lemon zest and vanilla.
  5. Mix in the ground almonds. Then sieve in the flour and Xanthan Gum. You will have a very thick batter which needs to be loosened with 3 tbsp milk. I mix on speed 1 in my Kenwood, until combined.
  6. Spoon into your tin and bake in the centre of the oven, for 1 hour and 15 minutes. Check it’s cooked through by inserting a skewer. It’s done if it comes out clean!
  7. Cool on a wire rack. Leave in the tin for 5 or 10 minutes first, to make it easier to remove.

Loaf cakes can be easily sliced for picnics and lunch boxes. They are low mess and keep for about a week, in an airtight container.

Gluten-Free Chilli Con Quorne With Cheesy Cornbread Muffins

18 May

I had a bag of cornmeal to use up, it seemed like the perfect partner for a chilli. So I decided to try something completely new and make one using Quorn, meat-free mince. It might seem like a lot of ingredients, but I’d really encourage you to give it go. It wasn’t particularly onerous or time consuming and it was dead tasty. Much better than the jars or packet mixes I have tended to rely on, since my cooking knowledge tends to centre around traditional English cuisine! Once again, I managed to eat it all before taking pictures – doh!

For the Chilli Con Quorne

Ingredients

  • 300g Quorn Mince
  • 2 tbsp vegetable oil
  • 1 medium onion, diced
  • Equivalent of 1 pepper, diced (I used a mix of 3 colours)
  • 1-2 tsp dried chilli flakes (2 is quite hot, almost a bit much for me!)
  • 1/2 tsp smoked paprika
  • 2 tsp ground cumin
  • 3 tsp ground coriander
  • 400g can of chopped tomatoes
  • 500g pack of tomato passata
  • 1 tbsp tomato puree
  • 1 heaped teaspoon vegetable boullion (I use Marigold)
  • 400g can kidney beans, drained and rinsed
  • 2 small squares dark chocolate
  • 1 large bunch coriander, chopped

Method

  1. Pre -heat the oil in a large frying pan and cook the onion for 5-6 minutes or until beginning to soften. Add the red pepper and continue to cook for a further 5 minutes. Add the dry spices and cook for a further 2 minutes stirring continuously
  2. Stir in the chopped tomatoes, passata, tomato puree and sprinkle inĀ the stock cube. Bring to a gentle simmer for 8 minutes stirring occasionally.
  3. Stir in the kidney beans and chocolate and Quorn Mince, cook over a gentle heat for a further 10-15 minutesĀ (10 if using fresh Quorn, 15 if using frozen). Season to taste.
  4. Stir in the chopped coriander and serve in bowls withĀ the cornbread muffins

For the Cornbread Muffins

Ingredients

  • 140g Fine Cornmeal (I used yellow)
  • 1/2 tsp Baking Powder
  • 2 tbsp Unsalted Butter, Softened
  • 70g Cheddar Cheese, Grated
  • 225ml Natural Yogurt
  • 1 Egg, Beaten

Method

  1. Preheat the oven to 200 degrees C/ Gas Mark 7
  2. Grease a muffin tray, but don’t line. Set to heat in the oven
  3. Sieve all the dry ingredients to togther in a large bowl
  4. Add the wet ingredients, including the cheese and mix on a medium speed until well combined, ensuring there are no lumps
  5. Pour into the muffin holes and bake for about 20 minutes, until golden.
  6. Serve immediately, whilst still warm!


Gluten-Free Deep Fried Halloumi

3 Feb

If you fancy giving something a little bit different a try, then how about this Gluten-Free Deep Fried Halloumi? It’s a really nice alternative to fish and chips! I’ve seen it in the odd gastro-pub too. I found this bag of FreeFrom White Breadcrumbs going for less than half price in my local Tesco. So I thought I’d give them a try.

You will need:

  • 1 block of halloumi cheese
  • 1 egg, whisked
  • 2 tbsp Gluten-Free plain flour
  • 4-6 tbsp Gluten-Free breadcrumbs
  • Also, a deep fat fryer full of oil!

Method

  1. Pre-heat your deep fat fryer to 190 degrees centigrade
  2. Cut your halloumi into 8 thick slices
  3. Dip these in the flour to coat and shake of the excess
  4. Dip these in the eggĀ to coat and shake of the excess
  5. Dip these in the breadcrumbsĀ to coat and shake of the excess
  6. Place into your deep fat fryer basket and fry for 4 minutes, until golden
  7. Raise the basket and shake off the excess oil, drain on kitchen paper.

I served mine with chips and peas. They would also be great in a wrap or a roll, like a burger. They really are that easy and you’ll be so impressed with the tasty result!

Jacket Potatoes with Smoky Bacon Beans

13 Jan

Make sure to cook your jacket potatoes in the oven, so they are crisp on the outside and fluffy in the middle! I can’t abide a microwave jacket potato, but even worse are those McCain frozen varieties which are completely and utterly tasteless!!! My husband swears that this is the best jacket potato topping he has ever tasted! This recipe serves 2, but is easily doubled or more.

Ingredients

  • 1 tablespoon oil
  • 4 rashers streaky bacon, cut into lardons or you can buy lardons but it’s cheaper to make your own!
  • 1/2 onion, chopped
  • pinch of chilli powder (optional)
  • 1/2 teaspoon dark brown sugar
  • 1/2 teaspoon smoked paprika
  • 1 tin baked beans
  • Don’t forget your jacket potatoes, I prick mine all over with a fork and cook for 45mins-1 hour in the oven
  • Sour cream & grated cheddar cheese to serve

Method

  1. In a large frying pan, heat your oil and then add the onion. Cook for a few minutes, until it begins to soften then add the bacon. Fry until cooked to your liking.
  2. Then add the baked beans, brown sugar, chilli & smoked paprika and gently heat through
  3. Slice open your jacket potatoes and top them. Spoon some sour cream on the side.


Isn’t that the quickest, easiest & tastiest dinner ever? Ours disappeared so fast I forgot to take photos!

Gluten Free Chocolate Log (Buche De Noel)

23 Dec

img_3818

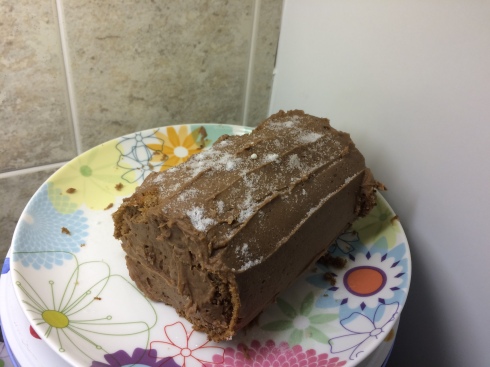
I didn’t manage to get a snap of this before it started being eaten, so we’ve already lost the branch! If you’ve never made a Chocolate Log Cake before then you’ve REALLY been missing out. You just can’t beat the lightness of the sponge and the richness of the all butter icing. You can never replicate this freshness with something shop-bought.

Did you know that a Buche De Noel is the traditional French Christmas Cake? It basically consists of a delicious chocolate Swiss Roll encased in a decadent chocolate buttercream icing. I think the French had the right idea, though I do also enjoy a slice of good old English Christmas Cake. This cake is obligatory in our household, as several family members dislike the fruit cake and Christmas pudding.

Ingredients

Cake

  • 4 eggs
  • 100g / 3 1/2 oz Caster Sugar
  • 75g / 2 3/4 oz Dove’s Farm Gluten Free Plain Flour
  • 1 tsp Xanthan Gum
  • 2 tbsp Cocoa


  • 1 tbsp caster sugar (for sprinkling)

Chocolate Buttercream

  • 170g / 6 oz Unsalted Butter (softened)
  • 225g / 8oz Icing Sugar
  • 1 tbsp Cocoa


  • 1 tbsp icing sugar (to decorate with snow effect)

Method

  1. Grease and line a 30 x 23 cm / 12 x 9 inch Swiss Roll tin.
  2. Preheat your oven to 200 degrees C or Gas Mark 6.
  3. Whisk the eggs and caster sugar in a bowl (either use a stand mixer with a whisk attachment or handheld mixer) for Ā approx 8-10 minutes. Stop when the mixture if very light and foamy and leaves a ribbon trail when you lift the beaters.
  4. Sieve in the flour, Xanthan Gum and cocoa and fold in using a spatula.
  5. Pour the mixture in your tin and level. Bake for 10-12 minutes until a skewer inserted comes out clean or the cake springs back when touched.
  6. Prepare another sheet of greaseproof paper and sprinkle over the 1 tbsp of caster sugar. Turn out your cake immediately onto this.
  7. Peel off the original greaseproof paper. Trim the edges of your cake (save them to eat in a moment for testing purposes of course!)
  8. Score a line about 1cm from the short edge, all the way across but do not cut through or it will not roll properly! Starting at that end, roll up your Swiss Roll tightly. Leave the greaseproof paper in place and cool on a wire rack.
  9. Then when the Swiss Roll is cooled, make the chocolate buttercream icing. SieveĀ the icing sugar and cocoa on top of the butter in a large bowl and beat until smooth. You can do this by hand with a wooden spoon, or I can do this on the lowest setting in my stand mixer.
  10. Carefully un-roll your Swiss Roll and remove the greaseproof paper.
  11. Spread 1/3 of the buttercream on the inside and re-roll. Then use the rest to coat the outside. It is up to you whether you leave the ends to show which can give quite a nice effect (like the rings of a tree). I cut 1/3 of my roll off and add it to one side to create the look of a branched log. You can also use a fork to texturise the surface of the icing and give the impression of bark, once the cake is covered. Then sprinkle 1 tbsp of icing sugar on top, to give the impression of freshly fallen snow.

I hope you have time to make this little festive treat; it is best eaten fresh asĀ a Swiss Roll is a fatless sponge and therefore it dries out more quickly than other cakes.

Merry Christmas everyone!
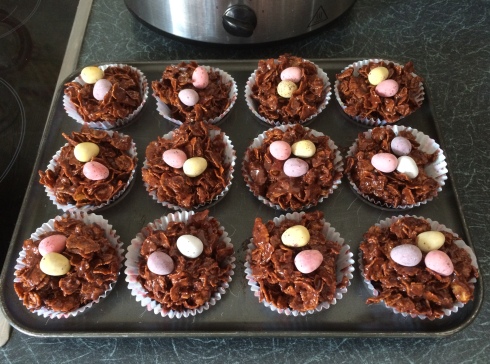
Gluten-Free Tunis Cake – My Christmas Gift To You All

9 Dec

This is my Christmas gift to you all. For years, I have grudgingly missed out on my favourite cake of them all – a Tunis cake. I swear this is the easiest cake you will ever make and the hardest part is getting it out of the tin! It has a subtle lemony twist, topped with thick, decadent chocolate which cracks when you cut into it. The cake is so moist, light and fluffy. It is better than any shop bought, gluten-filled cake any day! I wish you a very Happy Christmas and please share how you’ve got on with this recipe. I’d love to see yours.

Ingredients

Cake

  • 225g/8oz softened unsaltedĀ butter
  • 225g/8ozĀ caster sugar
  • 225g/8ozĀ gluten-free self-raising flour (I used Dove’s Farm)
  • 1 tsp Xanthan Gum
  • 70g/2Ā½ozĀ ground almonds
  • 4Ā eggs
  • 1Ā lemon, grated zest only
  • 2 tbsp water

Topping

350g dark plain chocolate

2-3 tbsp apricot jam

Decorations of your choice – I used edible rice paper snowflakes, as I had some to hand. If you want a more traditional appearance you can pipe on pink and yellow icing, adding some marzipan fruits to the centre.


Method

  1. Preheat the oven to 180C/350F/Gas 4 (fan 160C). Grease and line a 20cm/8in deep, loose-bottomed cake tin with baking paper (or I use non-stick liner from Lakeland). Make sure you have some excess sticking up around the sides, as you will need this when you apply your chocolate later.

  2. Add the butter, sugar, flour, Xanthan Gum, ground almonds, eggs, water and lemon zest to the bowl of a freestanding electric mixer (I use a Kenwood Chef with the K beater). Beat on the highest speed for one minute. Spoon the batter into the prepared cake tin and level the surface with a palette knife or spatula.

  3. Bake for 45 minutes, then cover with foil to prevent the top from browning and cook for a further 30 minutes, or until a skewer inserted into the centre comes out clean. Leave to cool completely in the tin on a wire rack.

  4. For the topping,Ā gently heat your Apricot jam either in the microwave for about 30 seconds or on the hob. Brush the top of your cake with a thin layer – it helps the chocolate to stick.

  5. Heat your chocolate in the microwave for 1-2 minutes until melted (or in a bain-marie on the hob. Try to temper your chocolate by stirring it and allowing it to cool (although I didn’t get as much of a shine as I would have liked on mine!) Then, pour over the melted chocolate and try to smooth it as much as possible.

  6. I left my chocolate to set before applying my decorations, but you might need to apply yours to it wet to get them to stick. I simply brushed the back of my rice paper snowflakes with a few drops of water to get them to stick.
  7. To serve, remove the cake from the tin and carefully peel off the parchment paper so that you get a clean line between the cake and the chocolate layer. As this is a special cake for Christmas, I applied a coordinating cake frill and secured it with a bead headed pin, so you don’t lose it.

Gluten-free Toad-in-the-Hole/ Sausage Toad/ Yorkshire Puddings

22 May

Goodness knows how this classic British dish got its name?! Anyway, it always was a favourite of mine, until I became gluten-free and it seemed impossible to turn out anything other than flat little doughy pancakes instead of Yorkshire puddings- ones that never did seem quite cooked in the middle!

IMG_2232

The good news is that a little bird recently told me the secret to getting perfect Yorkshires every time. So I thought it was about time to test the theory and see if it would also turn out a good Toad-in-the-Hole. You may also omit the sausages in order to make Yorkshire puddings. You can either make a giant one, or pour a small amount of oil into the bottom of each patty in a patty pan to make individual ones. I actually think the individual Yorkshires are the best, they rise so high- they are better than any I ever made with wheat flour!

Ingredients

  • 12 thin sausages (find a brand which works for you, as everyone has different preferences)
  • 3 eggs
  • 150ml milk
  • 100g cornflour
  • a little oil for greasing
  • salt & pepper to season

Method

  1. Pre-heat your oven to 200 degrees C and then put your sausages in a large tin or dish to start browning. It must have deep sides, so not a baking sheet as you want this to rise as much as possible! It’s a good idea to put a little oil in the pan so they don’t stick and then, neither will your batter when you add it. I gave my sausages a 20 minute head start as they were cook from frozen ones.
  2. Meanwhile make your batter. Whisk together the eggs, milk and cornflour as briskly with a balloon whisk as possible until well combined, no lumps. A good few minutes is best. Add a little salt and pepper to season. You can do this by hand, no problems. You might over-whisk if you use an electric mixer.
  3. Pour into your baking tin/ dish. Your oil must be really hot so make sure it has been in at least 10 minutes!
  4. Set the timer for 30 minutes, it may need slightly longer if your dish is deeper. DO NOT OPEN YOUR OVEN! Not even if tempted. If it has a window you may look through to see it rising.
  5. Et voila, it really is that easy. How’s that for a cheap, tasty and filling gluten-free supper? I served mine with vegetables and gravy.

Birthday treats!

20 May

It’s my Birthday and I make an exception to my normal rule of making it myself on such an occasion.

Birthday dessert courtesy of M&S. Belgian Chocolate Jaffa Spheres- Dark chocolate mousse with an orange marmalade centre dipped in dark Belgian chocolate. These were recommended by the shop assistant are were out of this world. Very decadent & rich, but worth the Ā£4 for 2 for a special occasion. Didn’t see those 25% off gluten-free product vouchers that have been talked about on various forums lately! šŸ˜¦

IMG_2209

Birthday afternoon tea at John Lewis, Southampton. They had a fantastic range of cakes to choose from, I plumped for this chocolate cake but I was spoilt for choice (how unusual!) I can’t remember all their offerings now, but there were also chocolate brownies, another large cake, Honeybuns cakes and chocolate covered rice cakes if you wanted something lighter. This slice was Ā£3.50, but was enough to feed two! I had a free hot drink and cake voucher and so did my mum, so all this cost nothing!

Gluten-free American Chocolate Brownies

9 Feb

Here’s a recipe I’ve been making since my early teens, it’s a sure fire winner and I’ve adapted it to make it gluten-free.

Ingredients

  • 4oz/ 100g unsalted butter
  • 1 1/2 oz/ 40g cocoa
  • 8 oz/ 225g caster sugar
  • 1 tsp vanilla essence
  • 2 oz/ 50g G/F self-raising flour ( I use Dove’s Farm)
  • 1tsp Xanthan Gum

(Optional)

  • 2 oz/ 50g raisins
  • 2 oz/ 50g walnuts (chopped)

Method

  1. Preheat the oven to Gas 4/ 350F/ 180C
  2. Grease and line a 20cm square baking tin with baking paper
  3. Melt the butter in a small saucepan over a low heat
  4. Sift in the cocoa powder and stir until blended
  5. Put to one side to cool slightly
  6. Beat the eggs and caster sugar together well, until pale. I use a Kenwood mixer, but a handheld would do just as well.
  7. Add the cocoa mixture and the vanilla essence
  8. Sift the flour and fold in until combined
  9. Stir in the nuts and raisins (if using)
  10. Pour into the tin and level the top
  11. Bake for 30 mins
  12. Allow to cool for 10 mins, before removing from the tin and stand on a rack to cool fully. Or, like me- eat whilst still warm!IMG_1816