Gluten-free Slow Cooker Sausage Casserole

8 Dec

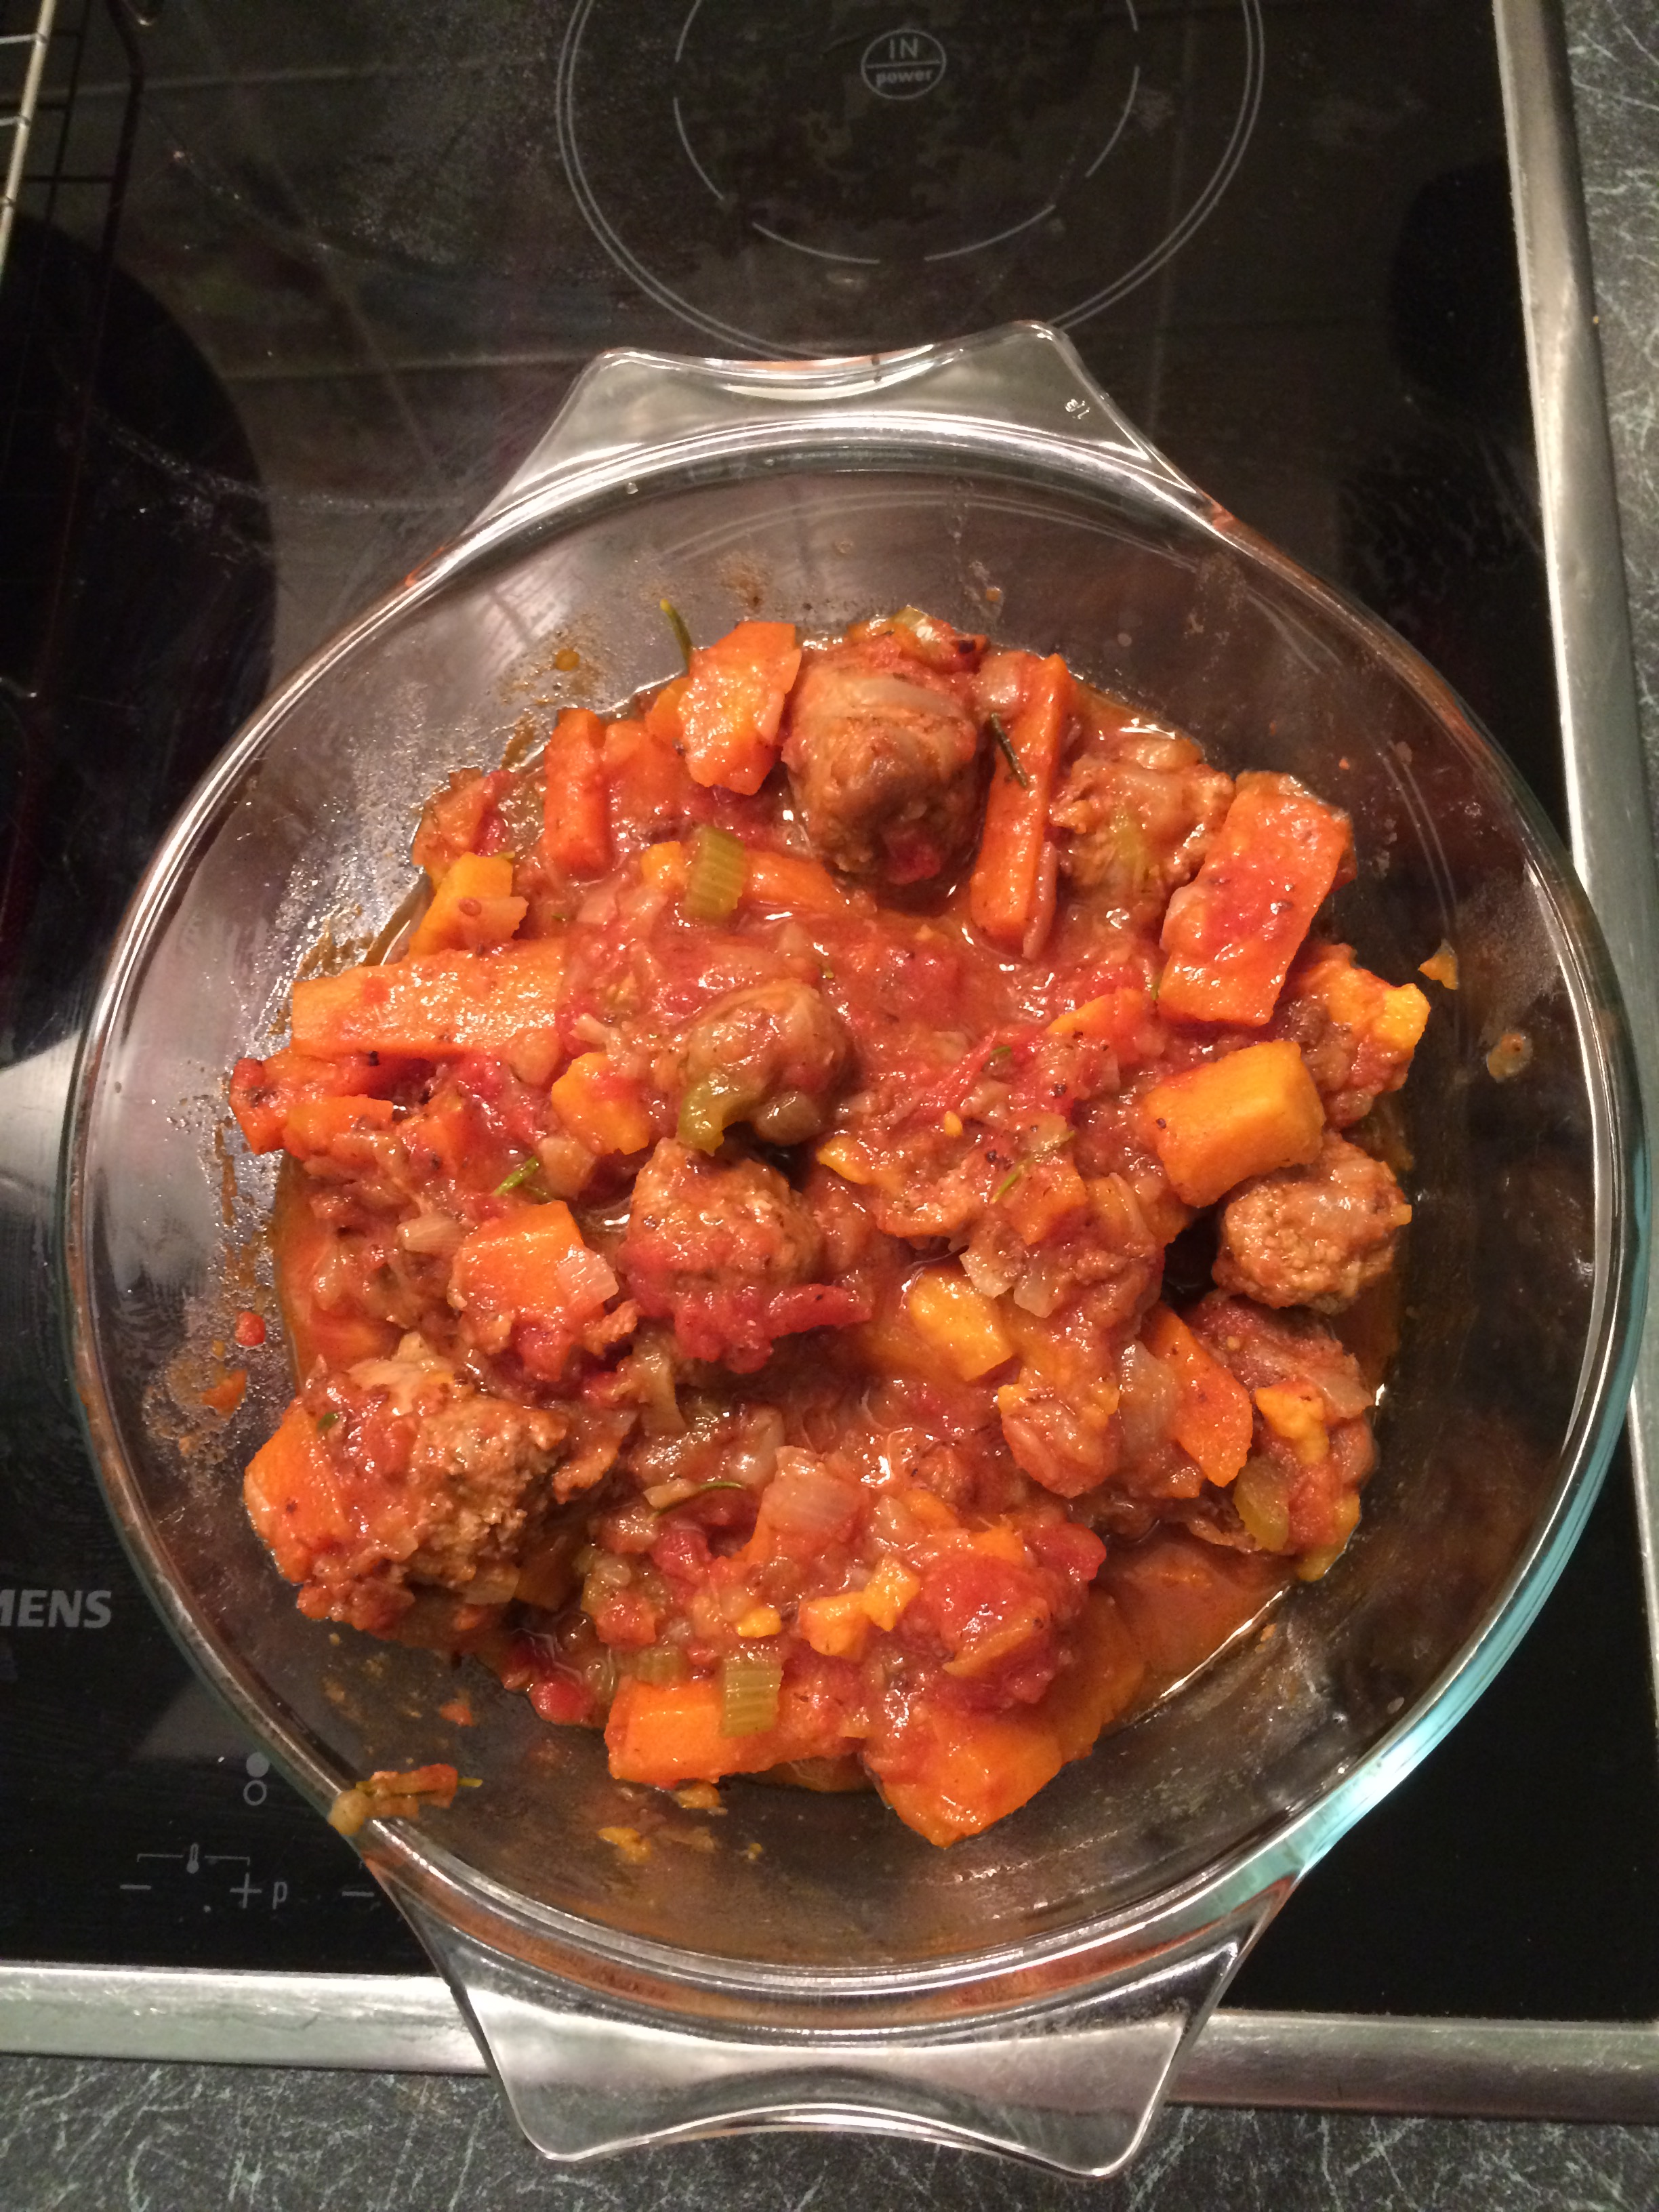
This dish is SO simple and a little bit of prep earlier in the day, will let you come home to a fabulous dinner. You could also cook this in the oven, in a casserole dish if you don’t have a slow cooker. However, I highly recommend getting one! I chose this Russell Hobbs one from Amazon because it had great reviews and it hasn’t let me down.

IMG_5153.JPG

Ingredients

  • 2 red onions, chopped
  • 1 stick of celery, chopped
  • 1-2 tbsp vegetable oil
  • 4 carrots, cut into thick slices
  • 8 sausages, cut into about 4 pieces each
  • 1 tin chopped tomatoes (approx 400g)
  • 1 tbsp tomato puree
  • 1 sprig rosemary (or 1 tbsp dried rosemary)
  • 1 sprig thyme (or 1 tbsp dried thyme)
  • 1 beef stock cube or stockpot dissolved in 500ml boiling water
  • 1 large sweet potato cut into medium sized chunks

Method

  1. Fry the onion and celery in the oil over a low heat until it starts to soften and cook, about 5 mins, then spoon it into the slow cooker. Fry the carrots briefly and add them too.
  2. Brown the sausages all over in the same frying pan – make sure they get a really good colour because they won’t get any browner in the slow cooker. Transfer to the slow cooker and add the sweet potato and tomatoes.
  3. Dissolve the stock cube in the boiling water. Put the purée in the frying pan and add stock, using a spoon or spatula to swirl everything around and scrape the bottom to pick up every last bit of flavour, and tip the lot into the slow cooker. Add the herbs. Cook on high for 4 hrs or on low for 8 hrs, then serve or leave to cool and freeze.

Gluten-free Crispie Cakes

10 Sep

I’m sorry for my lack of posts recently; I had a baby and that has been taking up rather a lot of my time. I’m back with a really simple recipe, which is about my level of available time right now! I can’t believe I haven’t shared my Grandma’s recipe with you before – I make it often. This recipe can easily be changed to make gluten-free Rice Krispie cakes, Cornflake cakes or Easter nests.

IMG_4927

Ingredients

  • 6 oz rice crispies or cornflakes
  • 4 oz caster sugar
  • 4 tbsp golden syrup
  • 6 oz plain chocolate (I use Sainsbury’s Basics)
  • 4 oz unsalted butter or margarine

Method

  1. Line a patty tin with paper cases
  2. Melt all the ingredients except the cornflakes or rice crispies in a large saucepan over a low heat, until smooth
  3. Stir in the cornflakes or rice crispies until coated
  4. Put a couple of spoonfuls into each paper case and leave to set

The bigger the better in my humble opinion, so if you have a muffin tin and muffin cases, you could be really naughty and use that. If you want to turn them into Easter Nests, then just add Mini chocolate eggs. I guess you could add any other additional decoration you like! Send me your pictures if you do, so we can all be inspired 🙂 Store in an airtight tin. These are better eaten within about 4 days, but they do keep longer – say up to a week. IF they last that long!!!

Gluten-Free Stollen

1 Jan

My apologies that this is a little late for Christmas 2017, but maybe you’ll make it anyway as winter treat. Stollen is a 14th Century treat; a rich fruit bread originating from Germany. It’s always been one of my favourite festive treats prior to being gluten-free, but none of the recipes I’d tried since had ever quite managed to emulate it. Whilst this may not be perfect, it’s pretty darn close IMHO.

If you have a Stollen pan, then you can by all means use it. But, if like me that’s something that would get very little use – I am suggesting you use a regular 2 lb loaf tin. Another option is just to try and shape a ciabatta style loaf by hand – it will spread more on a baking sheet. Whatever you use, just remember to line it with greaseproof paper! One final note, I find this is an ideal recipe to use up any leftover marzipan from making my Battenberg cake. If you have a smaller amount left, don’t worry – just throw it in, in smaller balls. It will still taste delicious!

Ingredients

  • 250g gluten-free self-raising flour
  • 1 tbsp baking powder
  • 1 tsp Xanthan Gum
  • 3 eggs, beaten
  • 50g unsalted butter, melted
  • 300ml sour cream
  • 100g caster sugar
  • grated zest of 1 lemon
  • 1 tsp Vanilla Extract or Essence
  • 200g glace cherries, cut into quarters
  • 100g unsalted pistachios
  • 100g dried fruit (use whatever you have to hand – sultanas, mixed fruit with peel or raisins)
  • 250g golden marzipan
  • Icing sugar, to dust

Method

  1. Preheat the oven to 180C/ Gas Mark 4/ 350F
  2. Sift the flour, baking powder and Xanthan Gum into a large bowl
  3. Add the eggs with the melted butter, sour cream and caster sugar and mix until you get a dough consistency. Stir through the lemon zest, dried fruit, cherries and pistachios so that they are evenly distributed.
  4. Roll your marzipan into a long sausage shape, on a clean surface dusted with icing sugar (to prevent it sticking). Place this in the centre of your tin.
  5. Pour your dough mixture of the top. Bake in the oven for 50-60 minutes, until a skewer inserted comes out clean.
  6. Turn out onto a wire rack to cool and dust with icing sugar before serving.

NOTE: I find this is best eaten straight from the oven whilst still warm or within 2-3 days. If you are not going to eat it all quickly, then slice it and freeze it between sheets of greaseproof.

Gluten-Free Chocolate & Vanilla Marbled Loaf Cake

29 Nov

You’ll have to excuse my half-eaten loaf cake pictures! I can never resist long enough to take a photo! Haha This is an adaptation of a Mary Berry recipe, to make it gluten free. It’s lovely, great for travel or lunchboxes and it will keep for several days in an airtight tin. In my opinion however, it was best on the day it was made. Loaf cakes are always drier because they take much longer to cook than other cakes. You can also ice this cake, if you wish, although I think the domed top of a loaf cake makes that rather tricky!

INGREDIENTS
For the cake

  • 225g (8oz) butter, softened
  • 225g (8oz) caster sugar
  • 275g (9¾oz) gluten-free self-raising flour
  • 2 level tsp baking powder
  • 1 level tsp Xanthan Gum
  • 4 large eggs
  • 2 tbsp milk
  • ½ tsp vanilla extract
  • 1½ level tbsp cocoa powder
  • 2 tbsp hot water

METHOD

Preheat the oven to 160°C/325°F/gas mark 3. Lightly grease a 900g (2lb) loaf tin. Line with a wide strip of non-stick baking parchment to go up the wide sides and over the base. You can also get those loaf tin liners which I’m sure make this easier!

Measure the butter, sugar, flour, baking powder, Xanthan Gum, eggs, milk and vanilla extract into a large bowl and beat in an electric mixer for about two minutes, until well blended. As you know, I always use my Kenwood stand mixer. Spoon half into another bowl and set aside.

In a small bowl, mix the cocoa powder and hot water together until smooth. Allow to cool slightly, then add to one of the bowls of cake mixture, mixing well until evenly blended.

Spoon the vanilla and chocolate cake mixtures randomly into the prepared tin until all of the mixture is used up, and gently level the surface.

Bake for one hour at 160 degrees C and then turn up the oven to 180 degrees C and cook for 20-30 mins more, until a skewer inserted comes out clean.

Allow to cool in the tin for a few minutes, then turn out on to a wire rack, peel off the lining paper and leave to cool completely.

Gluten-Free Peanut Butter Dark Chocolate Cupcakes

14 Nov

These cupcakes are moist, dark and deeply delicious. If for some reason you don’t like peanut butter, then just don’t spread it on top. I imagine a white chocolate icing, a sprinkling of icing sugar or anything else you care to imagine would pair up well with dark chocolate!

IMG_4375

Ingredients

  • 200g unsalted butter, straight from the fridge is fine
  • 2 tbsp cocoa powder
  • 100ml hot water
  • 200g dark chocolate (I used Sainsbury’s Basics)
  • 300g muscovado sugar, light or dark (I actually ended up using a mix because I didn’t have enough of one type)
  • 4 eggs
  • 175g gluten-free self-raising flour
  • 1 tsp baking powder
  • 1 tsp Xanthan Gum
  • Peanut butter
  • White chocolate buttons

You will also need some paper cupcake cases!

Method

  1. Heat oven to 180C/160C Fan/Gas Mark 4 and lay out your cupcake cases in patty pans. I found this mixture made 15 cupcakes.
  2. Put the cocoa in a small bowl or mug with 100ml hot water. Mix together until smooth, then set aside to cool slightly.
  3. Put the butter and chocolate in a heatproof bowl set over a pan of simmering water and melt gently together, stirring occasionally. Remove from the heat and allow to cool slightly.
  4. In a large bowl, beat the sugar and eggs together using an electric whisk until thick and pale. I use my Kenwood mixer with the whisk attachment. You need to beat it as you would for a swiss roll, until when the whisk is raised, it leaves a trail on the surface for a few seconds. If you have used dark Muscovado sugar then the colour change will not be a guiding factor.
  5. With the mixer still running, pour in the chocolate mixture carefully (use the lowest speed!), mixing until smooth and fully combined.
  6.  Sieve the dry ingredients over the chocolate mixture and fold together until no lumps remain. It’s best to do this with a spatula, work from the edges of the bowl into the centre, using a figure of eight motion. Lifting your spatula will help to keep the air in the mixture.
  7. Add the cocoa mixture and mix to combine. This will loosen the batter slightly.
  8. Divide the batter between your prepared tins. I’m sure there are various potential methods – I made a terrible mess using a spoon and spatula. Sometimes an ice-cream scoop helps, or perhaps you could pour it from a jug?
  9. Bake for 15-20 mins or until a skewer inserted into the middle comes out clean. Allow the cakes to cool in the tins for about 10 mins, then turn out onto a wire rack to cool completely.
  10. Ice with peanut butter straight from the jar and pop a white chocolate button on top for decoration and sweetness!

Gluten-Free Chocolate Chunk Pecan Cookies

27 Oct

Today I’m bringing you these amazing cookies, actually they are more like biscuits – very short in texture and packed with flavour! But they look like cookies, so I stuck with that name. They really do taste incredibly morish.

IMG_4349

Ingredients

  • 200g dark chocolate, chopped into chunks
  • 100g unsalted butter, softened
  • 50g light muscovado sugar
  • 85g golden caster sugar
  • 1 tsp vanilla extract
  • 1 egg, beaten
  • 100g pecan nuts, chopped
  • 100g gluten-free plain flour
  • 1 tsp Xanthan Gum
  • 1tsp Bicarbonate of Soda

Method

  1. Heat oven to 180C/fan 160C/gas 4.
  2. Melt 85g of the chocolate in the microwave on High for 1 min or over a pan of simmering water.
  3. Beat the butter, sugars, vanilla and egg until smooth (I use my Kenwood stand mixer with the K beater).
  4. Stir in the nuts and remaining chocolate, then sieve in the flour and bicarbonate of soda.
  5. Tip the dough out onto a piece of greaseproof paper and make into a log shape. Wrap in  foil and chill the dough in the fridge, until needed or at least 1 hour
  6. Chop the dough into roughly 1cm thick slices and space them apart, on 2 baking sheets.
  7. Bake for 15 mins until firm, then leave to cool on the sheets, on wire racks.


Gluten-Free Cherry and Sultana Cake

22 Oct

IMG_4333

This is a really yummy, lighter alternative to the traditional fruit cake. It’s great for travel or lunch boxes. It stores well for a week, in an air tight container or can be frozen.

Ingredients

  • 225g/ 8oz unsalted Butter
  • 225g/ 8oz caster Sugar
  • 275g/ 10oz gluten-free self-raising flour
  • 1 tsp Xanthan Gum
  • 2 tsp Baking Powder
  • 4 Eggs
  • 100g/ 4oz sultanas
  • 100g/ 4 oz dried cranberries or cherries (I used cherries this time, as it was all I had in the cupboard).
  • ¼ tsp Mixed Spice
  • ¼ tsp Ground Cinnamon
  • 3-4 tbsp Milk
  • 3 tbsp Demerara Sugar

Method

  1. Grease & line a large baking tin (approx 23x33cm). Preheat your oven to 180 degrees C/ Gas Mark 4.
  2. Measure all the ingredients, except the Demerara sugar into a large mixing bowl. (I use my Kenwood stand mixer for this). Beat with the ‘K’ beater on maximum speed until well blended.
  3. Tip into prepared tin & level the top. Sprinkle over the Demerara sugar.
  4. Bake for approx 35 minutes until golden and a skewer inserted comes out clean.
  5. Cool in the tin and then cut into squares.

If you’re not feeding a crowd, then freeze half of this mix.

Gluten-Free Lemon Bakewell Tart

18 Jul

Perhaps you remember my first foray into the world of Bakewell Tarts, back in October? Well, it was time to feed my addiction again and with half a jar of lemon curd needing to be used up in my fridge – that settled me on the idea of a Lemon Bakewell Tart. After all, lemon juice is an ingredient in traditional marzipan, so this is a match made in heaven! This is a totally different flavour, a little lighter for summer and is delicious to me. You just cannot beat the light, crisp, buttery texture of this homemade pastry topped with zingy lemon and heavenly frangipane. OK, I’ll admit that one of the hottest days of summer wasn’t the best day to choose to make pastry! But, even when it went into the pie dish looking like a disaster, it came out tasting like perfection. I kept this recipe very simple, as I was just trying to use up some items from my cupboard before I go on holiday, but I have suggested some additions below to amp up the lemon flavour. Just make sure you chill your pastry in this warm weather and don’t add too much liquid. I was going to pop this in the freezer, but I’m not sure it’s going to make it that far 😛

IMG_4194

For the sweet shortcrust pastry

  • 225g/8oz gluten free plain flour plus extra for dusting
  • 1 tsp Xanthan Gum
  • 150g/5½oz unsalted butter, chilled
  • 25g/1oz icing sugar
  • 1 egg, beaten

For the filling

  • 150g/5½oz unsalted butter, softened
  • 150g/5½oz caster sugar
  • 150g/5½oz ground almonds
  • 1 egg, beaten
  • 1 tsp almond extract
  • 1/2 jar of lemon curd (I used Sainsbury’s Basics)

You could decorate it with flaked almonds or make a little lemon flavoured glace (water) icing. You could also add lemon zest to the pastry.

Method

  1.  First, make your pastry. Sieve the flour into a bowl and rub in the butter using your fingertips or with a pastry blender, until the mixture resembles fine breadcrumbs. Sieve in the icing sugar and stir it through. Add the beaten egg and 2-3 tablespoons of cold water, mixing to form soft dough.

  2. Chill the dough in the fridge for 30 minutes. I find this makes gluten-free pastry slightly easier to roll out.
  3. Preheat the oven to 200C/180C Fan/Gas 6. Roll out the dough on a lightly floured work surface to the thickness of a pound coin. Or, if you are having problems (as I often do with gluten-free pastry) roll it out between 2 sheets of baking paper or clingfilm. I tried to turn mine over, into the pie dish but it got a bit crumpled! I patched the holes and it tasted great! Line a 23cm/9in fluted pie dish with the pastry.
  4. If you haven’t already got baking paper on it, line the pastry case with non-stick baking paper and fill with ceramic baking beans or uncooked rice. Bake it blind for 15 minutes, then remove the beans and paper and cook for a further 5-10 minutes to dry out the base. Set aside to cool a little before adding the filling.

  5. For the filling, spread the base of the pastry case with 1/2 jar of lemon curd.

  6. Cream the butter and sugar together until pale and fluffy. I used my Kenwood stand mixer with the K-beater. Add the ground almonds, egg and almond extract and mix together. Spoon the mixture into the pastry case, on top of the lemon curd and smooth the surface using a palette knife.

  7. Reduce the oven temperature to 180C/160C Fan/Gas 4 and bake for 45 minutes to 1 hour, until golden-brown and a skewer inserted in the centre comes out clean. The lemon curd seems to take longer to set. You may need to reduce the oven temperature if it’s browning too fast. Remove from the oven and leave to cool completely in the tin.

Product Review- Mannavida Gluten-Free Dinner Rolls Kit

11 Jul

These are the worst gluten-free purchase ever, I can’t believe I fell for the hype. I bought these at a local Coeliac Food Fair for £5. Yes, they are very expensive, but apparently they have won awards! As you know from all the other posts on my blog; I am an experienced gluten-free baker, so I know what I’m doing.

I followed the instructions exactly and spooned into the cases provided. Left to rise as instructed, nothing happened. Left to rise for longer, still no rise. I thought, oh well- I’ll have to bake them anyway. They went in looking grey and holey and that’s exactly how they came out. Ugh!

Then, I tried as per the instructions to remove them from the cases whilst they were still hot. They stuck, I tried to prise them out with a knife with little success. They were soft on the underside, so I put them back in to crisp up, again as per the instructions. They barely crisped up at all. I think the manufacturer should re-think the picture on the box, as they should be done for false advertising. I will be sending a lengthy complaint to the manufacturer and I will let you know the outcome. They look inedible and not in any way appetising. They are tasteless, but do have a reasonable chewy texture but with no crust. Please save yourself the time, trouble and money – DO NOT BUY THESE.

Product Review – Jusroll Gluten-Free Puff Pastry

10 Jul

You may remember that I wrote about Jusrol introducing a gluten-free pastry here. Well, I FINALLY found it in the shops! I decided to use it to replace my homemade pastry in my Potato, Leek & Cheese Pie to save a little time and see how it fared.

What a disappointment! I will never waste my money on this again. It comes ready-rolled around a cardboard spiral, but it’s very thin. It was easy enough to place on top of my pie filling, but it was so thin, I was barely able to crimp the edges. I brushed it with milk, as I  usually would to add some colour. But as you can see, it went far too dark in the required cooking time because it’s too thin. Ultimately it was extremely crisp and flavourless.

As for calling this puff pastry, it is not – it’s like a shortcrust, only there’s no substance to it at all. There was possibly 1 layer in the pastry, but even that was questionable. At £2 a packet, it’s 30% more expensive than making my own pastry as listed in that recipe. And it’s not a patch on the homemade version plus you are eating all manner of ingredients that you wouldn’t find in a homemade pastry, including preservatives. Although, they are pretty natural considering but no butter- so none of that flavour.

The pie went from being a substantial meal that I would normally get 8 portions from, to something that left us hungry and would only get 6 portions from. All in all, yes it is a time saver but it’s not a patch on taking the time to make your own. It’s considerably poorer value, as it’s more expensive and doesn’t stretch to as many portions.